Installation Information for the Cade Cork cont.
1) Remove the secondary gearbox from the bike. There are detailed instructions for this procedure contained in the Factory Service Manual.
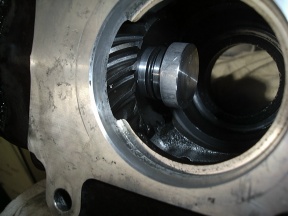
2) With the secondary gearbox on the bench, look inside through the motor-side seal and see if the stock plug is still in place in the front of the driven gear. If it is, drive it out by inserting a punch through the back-end of the driven gear and knock it into the gearbox and then discard it. If the plug was already out and inside the gearbox, remove it and discard.
3) Unscrew the 1/2 full-threaded bolt from the back of the replacement Plug. Put a small amount of lubricant on the o-ring and insert the threaded end of the Plug into the hole in the front of the driven gear as shown in the photo. This is made easier if the motor-side seal is removed. It is always good practice to replace the seal whenever the gearbox is removed from the motor. The seal is Suzuki part #09283-48012.
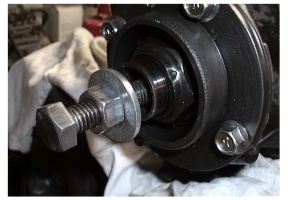
4) With the nut and washers on the bolt as it was delivered, insert the end of the full-threaded bolt into the back-end of the driven gear and thread it into the replacement Plug. You may need to grasp the Plug and hold it while threading the bolt into it. The bolt need not be tight but should thread in until resistance felt. It should thread into the Plug about 3/4. If you fail to thread it in far enough, the threads may pull out of the Plug as it is being drawn into the gear.
5) Put a few drops of oil on the threads of the bolt just above the gear and some on the face of the washer that will contact the nut. Thread the nut towards the back-end of the driven gear until the washer contacts the face of the gear.
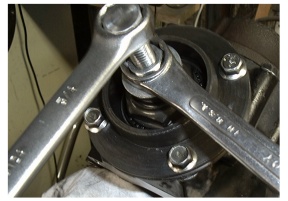
6) Using 2 - 3/4 end wrenches or a 3/4 socket and 1 - 3/4 end wrench, hold the bolt while threading the nut towards the driven gear (clockwise when looking at the head of the bolt) as shown in the photo. If the gear tries to turn when you turn the nut, the bolt will thread out of the Plug and it will not be drawn into the gear. If this happens, loosen the nut and insure that the bolt is threaded into the Plug fully and, using a thin piece (approx 1/8 thick) of soft metal such as aluminum, brass or copper, lock the gears from turning by wedging the end of the metal between the gears as they try to turn (you may need an extra hand for that). Thread the nut back towards the driven gear and using the wrenches, continue to draw the Plug into the gear.
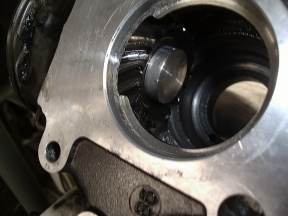
7) While drawing the Plug into the gear, there will quite a bit of resistance felt at the wrenches. If there is not, please stop and contact me. The plug is designed as a considerable press-fit and if it pulls in too easily, then it will not stay in as designed. When the Plug is fully drawn into the gear, the head of the Plug will contact the face of the gear as shown in the photo. This will be felt at the wrenches as they will become nearly impossible to turn further. Loosen the nut and remove the bolt from the Plug.
8) The Plug is now installed and the gearbox can be reinstalled on the bike after replacing seals, gaskets or other parts as needed. Dont forget to fill the gearbox to the proper level with the type and grade of lubricant recommended by the manufacturer. Check the level regularly.
To order the Cade Cork, click here.